


Automating AWS Infrastructure with Terraform: A Step-by-Step Guide to CI/CD Pipelines in Codegiant

Context
In the rapidly evolving landscape of software development, two concepts have stood out for their transformative impact: Infrastructure as Code (IaC) and Continuous Integration/Continuous Deployment (CI/CD).
IaC tools like Terraform have revolutionized how we manage and configure our software environments, increasing efficiency and reducing the risk of human error. On the other hand, CI/CD practices have streamlined the process of deploying changes and updates, ensuring that your software is always running at its peak potential.
Today, we will talk about a platform that elegantly marries these two concepts: Codegiant. Known for its comprehensive suite of DevSecOps tools, Codegiant's CI/CD pipeline stands out for its power, flexibility, and ease of use.
This blog post is primarily focused on demonstrating one of Codegiant's most impressive features: the ability to quickly and easily deploy infrastructure via its CI/CD pipelines. By leveraging Terraform and Codegiant together, we can spin up resources like an AWS S3 bucket in mere minutes.
So, whether you're a seasoned DevOps engineer or someone just starting your journey into IaC and CI/CD, stick around. We're going to dive into the step-by-step process of deploying an S3 bucket using Terraform on Codegiant's platform.
Let’s define the prerequisites you would need.
Pre-Requisites
AWS Account: First and foremost, you'll need an AWS account, as we'll be deploying resources on AWS. If you don't already have an account, you can create one here.
Code Repository: This tutorial assumes you have a repository that contains your Terraform scripts. We are using the AutoScaleupInfra Code Repository for S3 Bucket
Codegiant Account: Last but not least, you'll need a Codegiant account. Codegiant offers a freemium account which is more than enough to get started. You can sign up for a Codegiant account here, you sign up using Google a/c, BitBucket, or Github as well.
Our Deployment Goal
In this tutorial, we will be deploying an AWS S3 bucket using Terraform scripts. The deployment process will be automated via a CI/CD pipeline created in Codegiant. Simply put, by the end of this tutorial, you'll be able to automatically deploy an S3 bucket to your AWS account with a single push to your code repository.
In the following sections, we will walk you through the process of setting up your Codegiant project, building your CI/CD pipeline, and verifying the successful deployment of the S3 bucket.
Let’s get started.

Creating a Workspace
"The first step in Codegiant is to create a workspace. A workspace is essentially a space where your project resides. It's designed to help you organize your projects under different teams or departments. To create a workspace, click on the '+' icon next to 'Workspaces' on the sidebar."
Naming the Workspace
"After clicking on the '+' icon, you'll be prompted to give your workspace a name. Choose a name that best fits the nature of the projects that will be housed in this workspace."

Importing a Repository
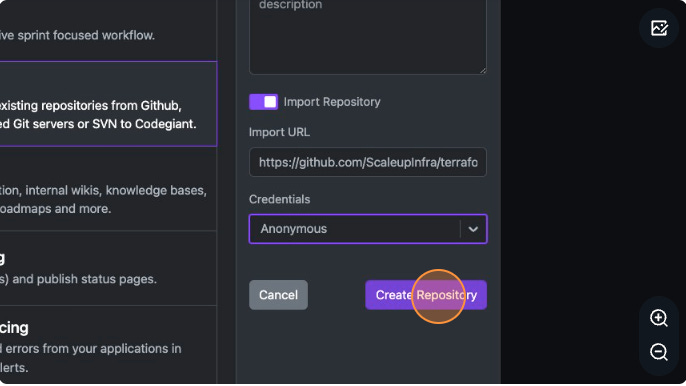
"Once your workspace is set up, the next step is to import your code repository into Codegiant. Click on 'Import Repository' to start the process. Codegiant provides seamless integration with popular version control systems like GitHub, GitLab, and Bitbucket. For this tutorial, we're importing a GitHub repository that contains our Terraform code."

Repository Imported
"After selecting the repository, Codegiant imports it into your workspace. You can now see your imported repository under the 'Repositories' section of your workspace. With our code in place, we're now ready to create our CI/CD pipeline."

Defining the Terraform Pipeline in Codegiant
Create a .codegiant-ci.yml(make sure the file name is .codegiant-ci.yml) file in the root of your repository.
Define the stages for the pipeline, such as init, plan, and apply.
Configure the jobs for each stage to run the Terraform commands using the environment variables for AWS credentials.
Commit and push the .codegiant-ci.yml file to trigger the pipeline.
Running the Pipeline
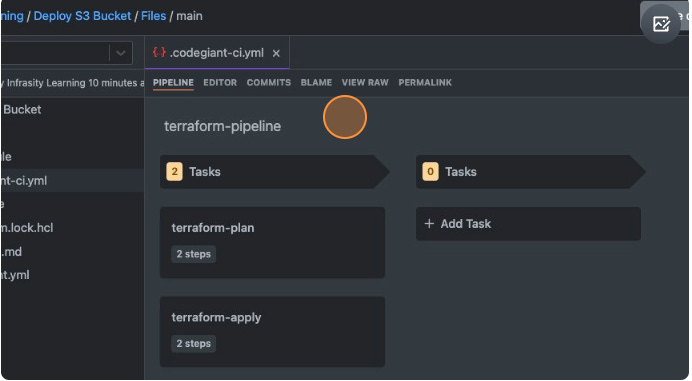
Open your Codegiant project and navigate to the repository with the .codegiant-ci.yml file.

Observe the pipeline as it runs through the stages: terraform-plan and then terraform-apply as you can see in the below screen shot.

Monitor the Terraform commands executed in each stage to create the S3 bucket and once the pipeline is green like below, you can go back to your AWS Console and check and should be able to find the S3 bucket created via Codegiant Pipeline
Looking for the .codegiant-ci.yml? Visit github and you’ll find the full working YAML.
In conclusion, we've witnessed the seamless integration of Codegiant's CI/CD pipeline with Terraform, automating the deployment of AWS S3 buckets. This powerful combination streamlines workflows, reduces errors and accelerates software delivery.
Take action now, and start transforming your development process with Codegiant's CI/CD and Terraform today!
Codegiant supports a simple issue tracker, git repositories, built-in CI/CD, and a documentation tool. If you’re tired of GitHub or GitLab’s complexity, check us out; we don’t bite :)