
Automating Serverless Deployment of Lambda Functions with Terraform using Codegiant’s CI/CD

Agenda
Create and test your Python file locally.
Create and test your terraform files to create AWS Lambda.
Push terraform and infra code into the repo, in this case, it is Codegaint GIT repo.
Import your repo to Codegiant’s workspace.
Add .codegiant-ci.yml in the workspace.
Update your .codegiant-ci.yml file as per need, and run the pipeline.
Deploy Python code locally
import json
def lambda_handler():
    return {
        'statusCode': 200,
        'body': json.dumps("Hello World, I'm Codegiant's CI/CD pipeline")
    }
print(lambda_handler())
The provided code snippet gracefully crafts a Python function named "lambda_handler" using the "def" keyword, designed to operate without any parameters for now.
Upon invocation, this function yields an API status code of "200," signifying "OK," and proudly presents a response body that warmly declares, "Hello World, I'm Codegiant's CI/CD pipeline."
To witness the marvel of this function, run the file on your terminal using the command "python <filename>.py" (make sure your terminal is in the same directory as of your python file to run).
It will print like this in your local:

For this tutorial, we shall employ the Python file function mentioned above.
Terraform main.tf file:
This is the most important file for the CI/CD deployment using Terraform.
Location terraform_aws_lambda/main.tf.
Important code snippets:
# Creating a lambda function with code from Zip files, and giving [REQUIRED] role to it
resource "aws_lambda_function" "test_lambda" {
  filename         = "${path.module}/zip/python_files.zip"
  function_name    = var.lambda_function_name.lambda
  role             = aws_iam_role.iam_for_lambda_tf.arn
  handler          = var.handler_name.handle # this is required since package type is a zip
  source_code_hash = data.archive_file.python_zip.output_base64sha256
  runtime          = var.runtime.version
}
Potential problems you might face:
In “resource "aws_lambda_function" "test_lambda" {...}” “handler” is an important tag, the value of which determines whether your code runs on Lambda function or not. So, stay attentive to it. “handler_name.handle” has a value stored in a variable.tf.
How to write “handle” value: Tips: always write, “filename.function_name” format to make your handler work. In our case it was “python.lambda_handler”.“python” python file name, “lambda_handler” function name used in the file.
Context
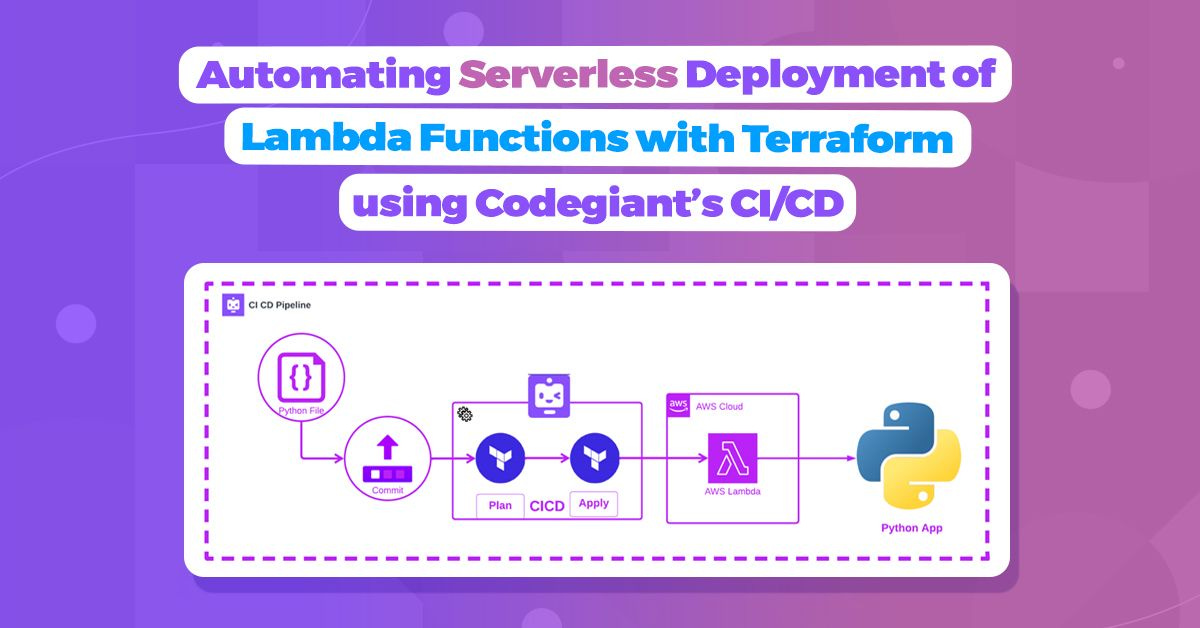
In this captivating blog post, our main focus shines on a remarkable aspect of Codegiant: the ability to effortlessly deploy serverless infrastructure VIA Codegiant’s CI/CD pipelines. By combining the powers of Codegiant pipeline and Terraform on AWS, we can quickly create resources, such as an AWS Lambda, in just a matter of minutes. It's a truly impressive and efficient feat!
Prepare for an exhilarating journey through this blog as we embark on an enthralling quest to craft and deploy our "Hello World" Lambda Function with the seamless aid of Codegiant's CI/CD prowess.
Let’s define the prerequisites you would need.
Pre-Requisites
Before embarking on our journey, let's ensure we have the essential prerequisites in place:
AWS Account: Our expedition involves deploying resources on AWS, so having an AWS account is paramount. If you don't have one yet, you can easily create it by visiting the AWS website.
Code Repository: This tutorial assumes that you possess a repository housing your Terraform scripts. For this guide, we'll utilize the "AutoScaleupInfra Code Repository" specifically designed for the Lambda Function.
Codegiant Account: Finally, to unlock the full potential of our adventure, you'll need a Codegiant account. Worry not, Codegiant offers a freemium account that's more than sufficient to begin your journey. You can sign up for a Codegiant account here, and you also have the option to use your Google, BitBucket, or Github credentials for seamless registration.
Our Deployment Goal
Welcome to this instructive tutorial! Our mission is to deploy an AWS Lambda using Terraform scripts, and we'll accomplish this feat through the magic of Codegiant's CI/CD pipelines. By the time you reach the end of this tutorial, you'll possess the power to effortlessly deploy your Lambda to your AWS account with just a single push to your code repository.
In the forthcoming segments, we'll guide you through the seamless setup of your Codegiant project. Then, we'll delve into the art of crafting your very own CI/CD pipeline. Finally, we'll revel in the satisfaction of confirming the triumphant deployment of your Lambda. Get ready for an empowering journey ahead!
Now, it's time to embark on our journey. Let's begin!
Creating a Workspace
"The first step in Codegiant is to create a workspace. A workspace is essentially a space where your project resides. It's designed to help you organize your projects under different teams or departments. To create a workspace, click on the '+' icon next to 'Workspaces' on the sidebar."
Naming the Workspace
"After clicking on the '+' icon, you'll be prompted to give your workspace a name. Choose a name that best fits the nature of the projects that will be housed in this workspace."

Importing a Repository
"Once your workspace is set up, the next step is to import your code repository into Codegiant. Click on 'Import Repository' to start the process. Codegiant provides seamless integration with popular version control systems like GitHub, GitLab, and Bitbucket. For this tutorial, we're importing a GitHub repository that contains our Terraform code."


Repository Imported
"After selecting the repository, Codegiant imports it into your workspace. You can now see your imported repository under the 'Repositories' section of your workspace. With our code in place, we're now ready to create our CI/CD pipeline."
“Add .codegiant-ci.yml file into your workspace repository with the following code”
apiVersion: tekton.dev/v1beta1
kind: Task
metadata:
  name: terraform-plan-apply-destroy
spec:
  params:
    - name: ARGS
      description: The terraform cli commands to run
      type: array
      default:
        - init
  steps:
    - name: init
      image: "docker.io/hashicorp/terraform:light"
      command:
        - terraform
        - init

    - name: terraform-plan
      image: "docker.io/hashicorp/terraform:light"
      env:
        - name: AWS_ACCESS_KEY_ID
          value: <your_key>
        - name: AWS_SECRET_ACCESS_KEY
          value: <your_token>
      command:
        - terraform
        - plan

    - name: terraform-apply
      image: "docker.io/hashicorp/terraform:light"
      env:
        - name: AWS_ACCESS_KEY_ID
          value: <your_key>
        - name: AWS_SECRET_ACCESS_KEY
          value: <your_token>
      command:
        - terraform
        - apply
        - "-auto-approve"

    - name: terraform-destroy
      image: "docker.io/hashicorp/terraform:light"
      env:
        - name: AWS_ACCESS_KEY_ID
          value: <your_key>
        - name: AWS_SECRET_ACCESS_KEY
          value: <your_token>
      command:
        - terraform
        - destroy
        - "-auto-approve"

---
apiVersion: tekton.dev/v1beta1
kind: Pipeline
metadata:
  name: terraform-pipeline
spec:
  tasks:
    - name: terraform-plan-apply-destroy
      taskRef:
        name: terraform-plan-apply-destroy
---
apiVersion: tekton.dev/v1beta1
kind: PipelineRun
metadata:
  name: run-terraform-pipeline
spec:
  pipelineRef:
    name: terraform-pipeline
The above code, initializes your terraform, and applies it. Here is the complete code for the .yml file.
Flow :
init
plan
apply
destroy
Note: Don’t forget to update your AWS_SECRET_ACCESS_KEY and AWS_ACCESS_KEY_ID.
To learn how to do so, check out this help center article.

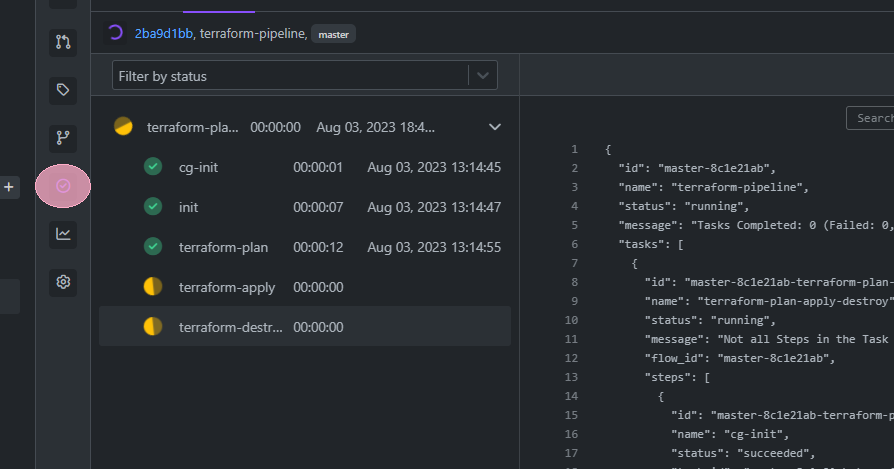
“Click on “pipeline” to see how many tasks are there in the pipeline.
“In our case, all execution is done under the first step”.

“ click on the side icon “pipeline” to see your running pipeline.”
In the meantime you can see, your function is being deployed on your AWS, with the name defined in variable.tf file (in our case).

Click on it.
You can see an endpoint url available for this function, that is set to be public.

Click it, you will be redirected to a new page with “Hello World, I'm Codegiant's CI/CD pipeline” written.
You have made a Lambda Function with just few clicks now.

Pipeline Run Successful:

On the complete run, you can see, your lambda function has been destroyed and everything is cleaned-up, you can change clean-up whenever you need from the .yml file.
In our situation, we performed a cleanup because it was a test environment, and we wanted to avoid incurring costs for resources not actively in use.
Looking for a complete code repository visit
To sum it up, we have experienced the fusion of Codegiant's CI/CD pipelines with Terraform, effortlessly automating the deployment of Lambda Functions. This dynamic alliance enhances efficiency, minimizes errors, and propels software delivery to new heights.
We made a local file for the Python app and tested it.
We pushed our local code to the repository and imported that repo to Codegiant.
We created a .yml file and pushed it to the same Codegiant workspace.
Spin up the lambda function and access the public URL for the output.
Codegiant supports a simple issue tracker, git repositories, built-in CI/CD, and a documentation tool. If you’re tired of GitHub or GitLab’s complexity, check us out; we don’t bite :)