
Deploying an App to Google Kubernetes Engine with Codegiant
In this article, we'll learn how to use Codegiant to set up and manage CI/CD pipelines for applications deployed on Google Kubernetes Engine (GKE). We'll explore how to create a Kubernetes cluster, dockerize our application, and automate its build and dep

Continuous Integration and Continuous Deployment (CI/CD) are key practices in managing and automating workflows in Kubernetes environments.
In this article, we'll learn how to use Codegiant to set up and manage CI/CD pipelines for applications deployed on Google Kubernetes Engine (GKE). We'll explore how to create a Kubernetes cluster, dockerize our application, and automate its build and deployment process to GKE.
Prerequisites
To successfully deploy an application to Google Kubernetes Engine (GKE) using Codegiant, the following prerequisites are required:
Google Cloud Platform (GCP) Account: A GCP account is necessary as GKE is a part of Google Cloud's services. Create an account at cloud.google.com if you don't already have one.
Codegiant Account: You will need a Codegiant account for managing CI/CD pipelines and source code. Sign up at codegiant.io if you haven’t done so.
Docker Account: A Docker account is required for containerizing the application. Sign up at Docker Hub if you don't have an account. This will be used for storing and managing Docker images.
Local Development Environment Setup for Docker: Install Docker Desktop or a similar tool on your system. Confirm the installation by running docker --version in your command line.
Basic Knowledge of Kubernetes and Docker: A fundamental understanding of Docker and Kubernetes is beneficial. This includes knowledge of Dockerfiles, the concept of containerization, and basic Kubernetes constructs like pods and services.
With these prerequisites in place, you are ready to begin the process of deploying your application on GKE using Codegiant’s CI/CD pipeline.
Dockerizing our Application
To deploy our application to GKE, we first need to containerize it using Docker. This is achieved by creating a Dockerfile, which provides instructions for building the Docker image. Here’s an example of what a Dockerfile might look like for a Node.js application:
FROM node:14-alpine
WORKDIR /app
COPY package*.json ./
RUN npm install
COPY . .
RUN npm run build
EXPOSE 3000
CMD ["npm", "start"]This Dockerfile (named Dockerfile without any extension) outlines the steps to build your Node.js application's Docker image:
Base Image: Starts with
node:14-alpine, a lightweight Node.js runtime.Working Directory: Sets
/appas the working directory inside the container.Copying Files: Transfers
package.jsonandpackage-lock.jsonto the container, followed by the rest of your project files.Installing Dependencies: Runs
npm installto install necessary dependencies.Building the App: If it's a React app,
npm run buildcompiles the application.Exposing Port:
EXPOSE 3000makes the application accessible on port 3000.Starting the App:
CMD ["npm", "start"]defines the command to start the application when the container is initiated.
With this Dockerfile, you can build a Docker image of your application by running docker build -t yourappname . in the command line. After building, you should test the Docker image locally with docker run -p 3000:3000 yourappname to ensure it runs correctly. Finally, push the image to Docker Hub using docker tag and docker push commands.
When setting up the CI/CD pipeline in Codegiant, we'll automate this process of building and pushing the Docker image to Docker Hub. So all you need to worry about is creating the Dockerfile and testing the image locally.
Configuring Kubernetes Deployment and Service Files
Once the Dockerfile is ready, the next step is to create Kubernetes deployment and service configuration files. These files are written in YAML and define how the application should be deployed and managed in the Google Kubernetes Engine (GKE) environment.
Kubernetes Deployment File:
This file describes the desired state of your application's deployment, including the Docker image to use, the number of replicas, and other specifications. Create a file named deployment.yaml and include the following basic structure:
apiVersion: apps/v1
kind: Deployment
metadata:
  name: yourapp-deployment
spec:
  replicas: 3
  selector:
    matchLabels:
      app: yourapp
  template:
    metadata:
      labels:
        app: yourapp
    spec:
      containers:
        - name: yourapp
          image: yourdockerhubusername/yourappname:tag
          ports:
            - containerPort: 3000
          resources:
            requests:
              cpu: '0.1'
              memory: '256Mi'
            limits:
              cpu: '0.5'
memory: '512Mi'Replace yourapp, yourdockerhubusername/yourappname:tag, and containerPort with your application's name, Docker image, and port number, respectively. The replicas field defines the number of instances of your application that you want running, while the resources field specifies the CPU and memory limits for each instance.
Kubernetes Service File:
This file creates a service that exposes your application to the internet or internal network. The service uses a selector to connect to the deployment via the matching label. Create a file named service.yaml with the following content:
apiVersion: v1
kind: Service
metadata:
  name: yourapp-service
spec:
  type: LoadBalancer
  ports:
    - port: 80
      targetPort: 3000
  selector:
app: yourappHere, type: LoadBalancer creates a cloud provider's load balancer to distribute traffic. There are other types of services, such as ClusterIP and NodePort, which you can use depending on your requirements. In this example, we are using LoadBalancer to expose the application to the internet.
The port is the external port to be accessed from outside, while targetPort is the port on which your application is running inside the container. To ensure proper connectivity, the port and targetPort in the service file should match the port number specified in the deployment and Dockerfile, respectively.
These two files, deployment.yaml and service.yaml, are crucial for deploying and managing your application in Kubernetes. The deployment file ensures that the desired number of instances of your application is always running, and the service file makes the application accessible via a stable endpoint. Once these files are configured, they will be used in the subsequent steps to deploy the application to GKE using Codegiant's CI/CD pipeline.
Setting up a Kubernetes Cluster in GKE
With the Docker image and Kubernetes configuration files ready, we can now set up a Kubernetes cluster in GKE. This is where our application will be deployed and managed. To create a cluster, follow these steps:
Create a Project: Log in to your GCP account and create a project. This project will be used to host the Kubernetes cluster.

Enable Kubernetes Engine API: In the GCP console, go to APIs & Services > Library and search for Kubernetes Engine API. Click on the result and enable the API.

Create a Cluster: In the GCP console, go to Kubernetes Engine > Clusters and click Create Cluster. You'll see an option to create a standard cluster (which gives you more control over the cluster's configuration) or an Autopilot cluster (which allows GKE to manage the underlying infrastructure, including node provisioning based on your workload). For this tutorial, we'll create an Autopilot cluster. Enter a name for the cluster and select the desired region or zone. Click the "Create" button to create your cluster. This may take a few minutes.

Creating a Service Account in GKE
For a CI/CD pipeline to interact with your Kubernetes cluster in Google Kubernetes Engine (GKE), you need to create a service account. This account provides the necessary permissions for Codegiant to deploy applications to the cluster.
Here's how to create and configure a service account:
Access the IAM & Admin Section: In your Google Cloud Console, navigate to the "IAM & Admin" section. This area allows you to manage access and permissions within your GCP environment.
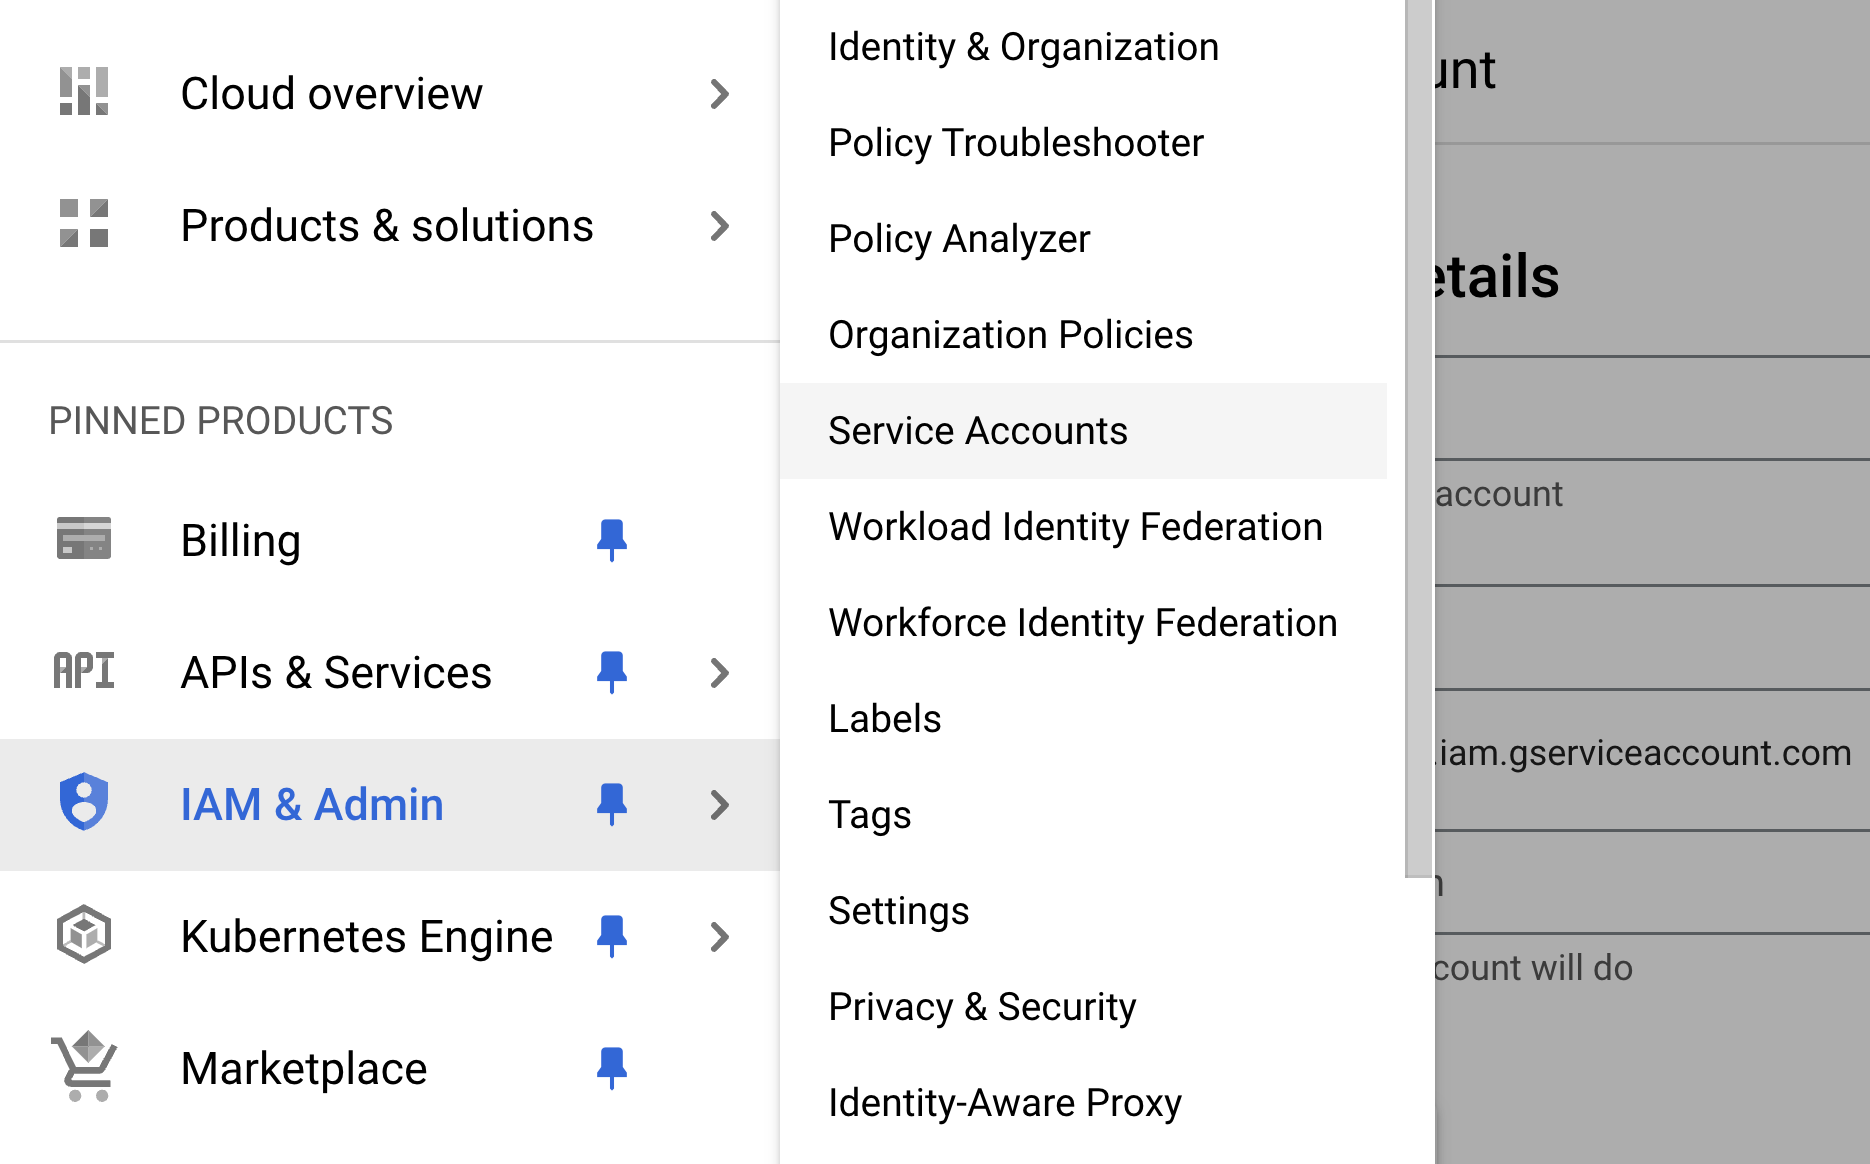
Create a New Service Account: Click on “Service Accounts” and then select “Create Service Account”. Name your service account (e.g., codegiant-cicd) and provide a brief description. It's important to choose a name that clearly indicates the service account's purpose.

Assign Necessary Roles: Assign roles to your service account that grant the required permissions for managing the Kubernetes cluster. At a minimum, the service account should have roles like "Kubernetes Engine Admin", “Storage Admin” and “Service Account User”. These roles enable the CI/CD pipeline to deploy applications, manage container storage, and access other resources in the cluster. You can also assign more granular roles if needed.

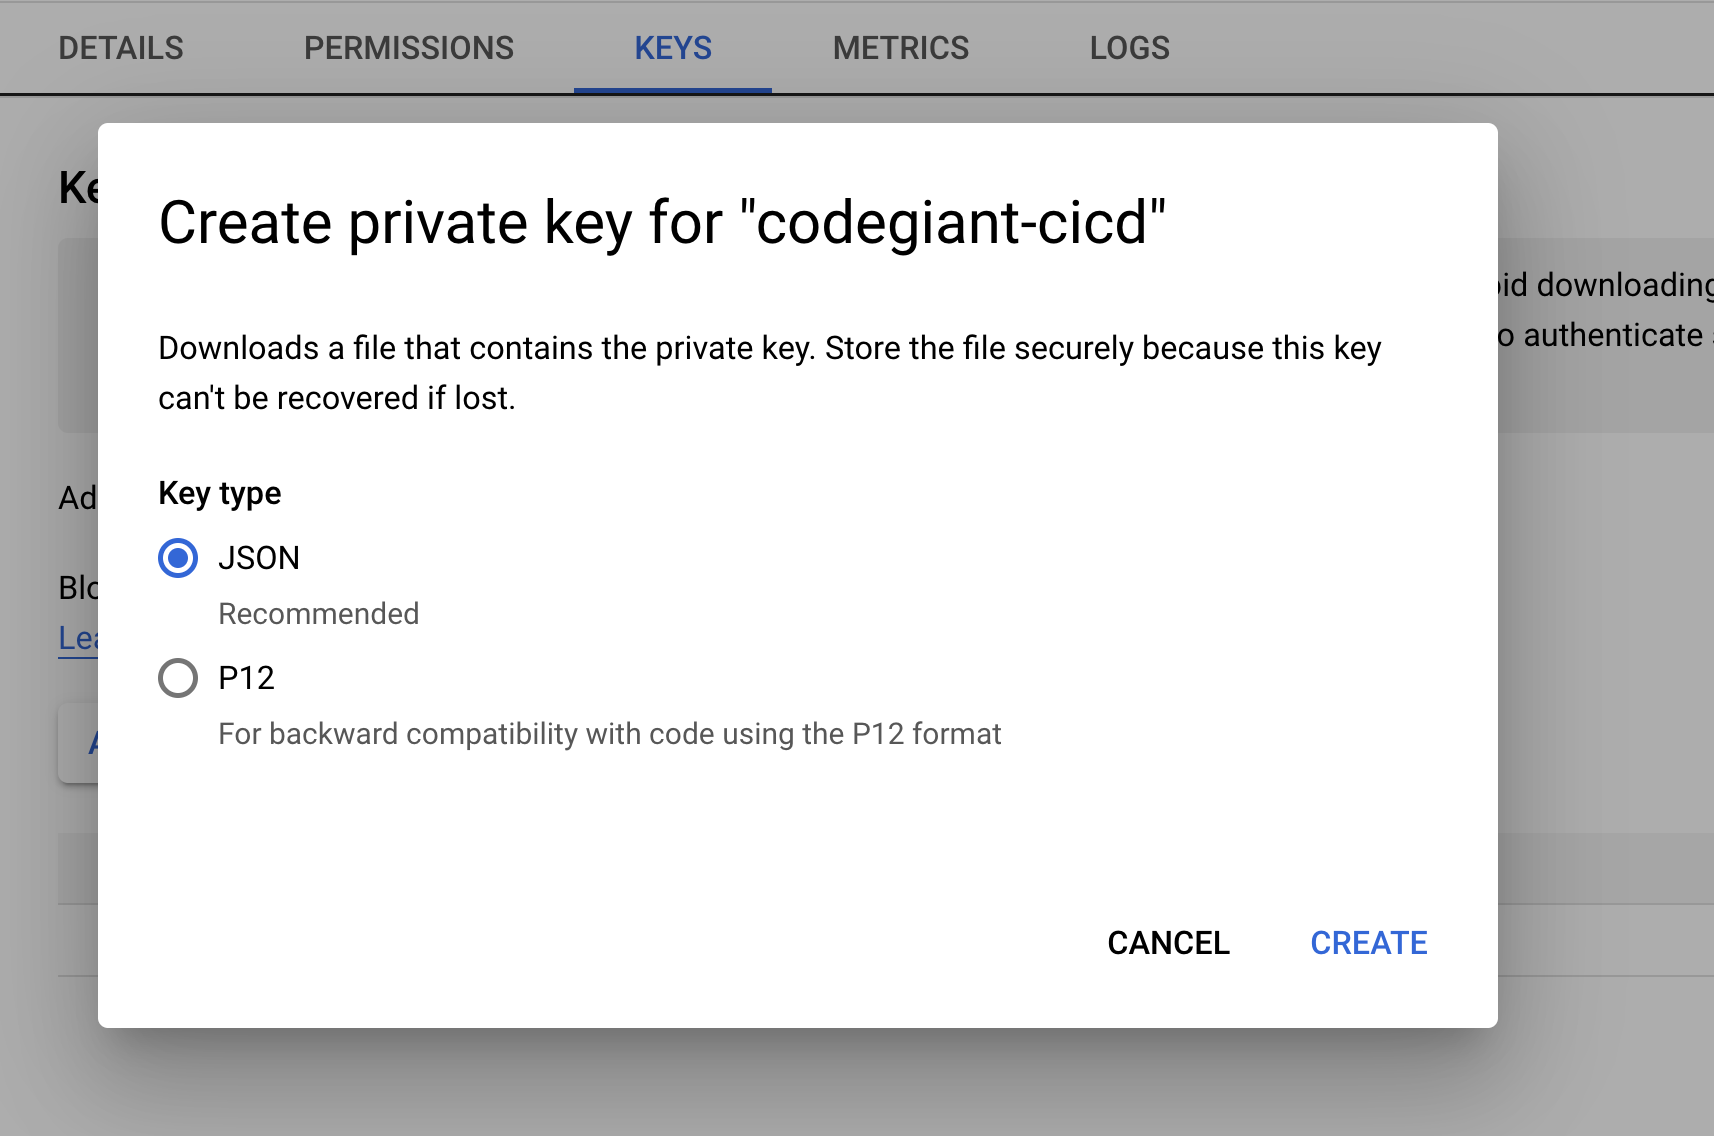
Create and Download the JSON Key: After creating the service account and assigning roles, create a key for the account. Click the service account you just created and go to the “Keys” tab. Choose the “Add Key” option, select JSON as the key type, and click “Create”. This will download a JSON file containing the key. This file will be used in Codegiant to authenticate with GKE.
Secure the JSON Key File: Store the downloaded JSON key file securely. It contains sensitive information that grants access to your GKE resources. You will need to add the contents of this file to Codegiant later.
With the service account created and configured, you are now ready to set up the CI/CD pipeline in Codegiant.
Setting up our project repository in Codegiant
To set up the CI/CD pipeline in Codegiant, we first need to create a project repository. This repository will contain the source code for the application and the configuration files for the CI/CD pipeline. Here's how to create a project repository in Codegiant:
Add a New Workspace Item: Log in to your Codegiant account and click the "plus" button beside the "Workspaces" section in the sidebar. Select "Git Repository" from the modal that appears.

Create a Repository: Enter a name and description for your repository. You'll also see an option to import an existing repository from a different source. If you have an existing repository, paste the URL in the "Import URL" field. Otherwise, leave it blank and click "Create Repository" to create a new repository.

With the repository created, you can now add the source code and configuration files for your application.
Configuring the CI/CD Pipeline in Codegiant
Next, we'll configure the CI/CD pipeline in Codegiant. This pipeline will automate the build and deployment process for our application. Here's how to set up the pipeline:
Initiate Pipeline Setup: Open your repository in Codegiant, right-click the root directory, and select "Setup Pipeline (CI/CD)". This action initiates the pipeline configuration process.

Choose Pipeline Configuration: You'll be presented with an option to pick from various CI configuration templates or to start from scratch. These templates provide pre-configured settings based on common CI processes and can be a quick start depending on your project's needs. For the purpose of this tutorial, however, we will set up a pipeline from scratch.

Seed New Pipeline: Click on the "Seed new pipeline" button. Codegiant will create a
.codegiant-ci.ymlfile in your project’s root directory. This file is the backbone of your CI/CD pipeline configuration.
When you open the .codegiant-ci.yml file, you will notice the "Pipeline" and "Editor" tabs. The "Pipeline" tab provides a GUI for configuring tasks, while the "Editor" tab allows direct editing of the .codegiant-ci.yml file.

Initially, the file contains a basic configuration that looks like this:
apiVersion: tekton.dev/v1beta1
kind: Task
metadata:
  name: task
spec:
  steps:
    - name: hello-world
      image: ubuntu
      script: |
        #!/bin/bash
        echo 'Hello World!'

---
apiVersion: tekton.dev/v1beta1
kind: Pipeline
metadata:
  name: pipeline
spec:
  tasks:
    - taskRef:
        name: task
      name: task-run

---
apiVersion: tekton.dev/v1beta1
kind: PipelineRun
metadata:
  name: pipeline-run
spec:
  pipelineRef:
name: pipelineLet’s break down the components of the base configuration:
Tekton Pipelines: Codegiant utilizes Tekton, an open-source framework for creating CI/CD systems. Tekton is part of the Continuous Delivery Foundation and is specifically designed to take advantage of Kubernetes, making it an ideal choice for cloud-native CI/CD workflows.
Task: This is the smallest configurable unit in Tekton and represents a set of operations to be performed. In the example, the task is named 'task' and consists of a single step that runs a script in an Ubuntu container, printing 'Hello World!'.
Pipeline: A Tekton Pipeline defines a series of tasks that will be executed in the order they are defined. Here, it references the 'task' defined earlier.
PipelineRun: This part triggers the execution of the Pipeline. It references the pipeline 'pipeline' to be run.
This basic configuration is a starting point. You'll typically modify the .codegiant-ci.yml to suit your specific build, test, and deployment needs. We'll do this in the next step when we configure the pipeline to build and deploy our application to GKE.
Adding Environment Variables / Secrets in Codegiant
Before we can configure the CI/CD pipeline to deploy our application to GKE, we need to add some environment variables to our project in Codegiant. These variables will be used in the pipeline configuration to authenticate with GKE and Docker Hub.
In your Codegiant project, go to Settings > Pipeline > Secrets and click "New Secret". Enter the key and value of the secret and click "Save Variable" to save it. For this tutorial, we'll add the following variables:
CI_REGISTRY_USER: Your Docker Hub username
CI_REGISTRY_PASSWORD: Your Docker Hub password
CI_REGISTRY_IMAGE: Your Docker Hub image name. This is typically in the format
yourdockerhubusername/yourappnamePROJECT_ID: Your GCP project ID
COMPUTE_REGION: The region where your GKE cluster is located
CLUSTER_NAME: The name of your GKE cluster
CONTAINER_NAME: The name of your application's container as specified in the deployment file
SERVICE_ACCOUNT: The contents of the JSON key file for your service account. This is the file you downloaded when creating the service account in GKE.
DEPLOYMENT_NAME: The name of your application's deployment as specified in the deployment file
These variables will be used in the pipeline configuration to authenticate with GKE and Docker Hub.

Customizing the CI/CD Pipeline to Deploy to GKE
Now that we have a basic CI/CD pipeline in place, we can customize it to build and deploy our application to GKE. Here's how to do this:
1. Update the Task Configuration
First, modify the initial task in the .codegiant-ci.yml file. Replace the existing task with the following:
apiVersion: tekton.dev/v1beta1
kind: Task
metadata:
  name: build-deploy
spec:
  steps:
    - name: build
      image: 'docker:24.0.5'
      env:
        - name: DOCKER_HOST
          value: 'tcp://localhost:2376'
        - name: DOCKER_TLS_VERIFY
          value: '1'
        - name: DOCKER_CERT_PATH
          value: /certs/client
      script: |
        docker login -u $CI_REGISTRY_USER -p $CI_REGISTRY_PASSWORD
        docker build -t $CI_REGISTRY_IMAGE:latest .
        docker push $CI_REGISTRY_IMAGE:latest
      volumeMounts:
        - mountPath: /certs/client
          name: dind-certs
    - name: deploy
      image: 'google/cloud-sdk:latest'
      script: |
        echo $SERVICE_ACCOUNT > /tmp/service_account.json
        gcloud auth activate-service-account --key-file /tmp/service_account.json
        gcloud config set project $PROJECT_ID
        gcloud config set compute/region $COMPUTE_REGION
        mkdir -p /workspace/.kube
        export KUBECONFIG=/workspace/.kube/config
        gcloud container clusters get-credentials $CLUSTER_NAME --region $COMPUTE_REGION
        kubectl apply -f deployment.yaml
        kubectl apply -f service.yaml
        kubectl set image deployment/$DEPLOYMENT_NAME $CONTAINER_NAME=$CI_REGISTRY_IMAGE:latest
Build Step: Uses Docker to build and push your application's image to a registry (like Docker Hub). We've referenced the variables CI_REGISTRY_USER, CI_REGISTRY_PASSWORD, and CI_REGISTRY_IMAGE which we added in the pipeline "secrets" settings. The VolumeMounts section mounts the Docker certificates to the container.
Deploy Step: Uses Google Cloud SDK to authenticate with GCP, configure the project and region, get credentials for your GKE cluster, and then apply your Kubernetes deployment.yaml and service.yaml files. It also updates the deployment to use the new image. Environment variables SERVICE_ACCOUNT, PROJECT_ID, COMPUTE_REGION, CLUSTER_NAME, DEPLOYMENT_NAME, and CONTAINER_NAME are also referenced here.
2. Configure Docker-in-Docker SidecarNext, we need to configure a Docker-in-Docker (DinD) sidecar. This will allow us to run Docker commands in the pipeline. Add the following to the .codegiant-ci.yml file:
sidecars:
  - image: 'docker:24.0.5-dind'
    name: server
    resources:
      requests:
        memory: 2Gi
        cpu: 2000m
      limits:
        memory: 2Gi
        cpu: 2000m
    args:
      - '--storage-driver=vfs'
      - '--userland-proxy=false'
      - '--debug'
    securityContext:
      privileged: true
    env:
      - name: DOCKER_TLS_CERTDIR
        value: /certs
    volumeMounts:
      - mountPath: /certs/client
        name: dind-certs
    readinessProbe:
      periodSeconds: 1
      exec:
        command:
          - ls
          - /certs/client/ca.pem
3. Define Necessary Volumes
Add a volumes section to define storage for Docker certificates:
volumes:
  - name: dind-certs
    emptyDir: {}
4. Update Pipeline and PipelineRun
Now, update the Pipeline and PipelineRun sections to use the build-deploy task:
---
apiVersion: tekton.dev/v1beta1
kind: Pipeline
metadata:
  name: pipeline
spec:
  tasks:
    - name: run-build-deploy
      taskRef:
        name: build-deploy

---
apiVersion: tekton.dev/v1beta1
kind: PipelineRun
metadata:
  name: pipeline-run
spec:
  pipelineRef:
    name: pipeline
Final StepsAfter editing the .codegiant-ci.yml file with these configurations, your CI/CD pipeline is now equipped to build your application's Docker image, push it to a container registry, and deploy it to your GKE cluster. Ensure you've set all the necessary environment variables in Codegiant's pipeline settings. This setup automates your deployment process, ensuring consistent and efficient application updates in GKE.
Next, make a commit to your repository to trigger the pipeline. You can monitor the pipeline's progress by clicking on the "Pipelines" tab in your repository.

Once the pipeline is complete, you can verify that the application is running in GKE by going to Kubernetes Engine > Workloads in your GCP console.
Conclusion
In this tutorial, we learned how to deploy an application to Google Kubernetes Engine (GKE) using Codegiant's CI/CD pipeline. We explored how to create a Kubernetes cluster, dockerize our application, and automate its build and deployment process to GKE. We also learned how to configure the CI/CD pipeline in Codegiant to build and deploy our application to GKE.
Codegiant's CI/CD pipeline provides a flexible way to automate the deployment of applications to GKE. With Codegiant, you can easily manage your application's lifecycle, from development to production, with minimal effort.
I hope you found this tutorial helpful. If you have any questions or feedback, please feel free to reach out to me via the comments section below or send me a DM on LinkedIn. Keep building awesome products!